Postgres-BDR 3.0 with OmniDB
Introduction
OmniDB 2.8 introduced support for Postgres-BDR 3.0, the ground-breaking multi-master replication tool for PostgreSQL databases, announced last month in PostgresConf US.
Here we have 2 virtual machines with Postgres-BDR 3.0 installed and we will use OmniDB to connect to them and setup replication between the machines.
Pre-requisites
Postgres-BDR 3.0 requires PostgreSQL 10 or better and also pglogical 3.0 extension should be installed, as Postgres-BDR 3.0 works on top of pglogical 3.0. Make sure you put the required entries in pg_hba.conf to make both machines communicate to each other via streaming replication. Then, in postgresql.conf you should set the following parameters in both machines:
listen_addresses = '*'
client_encoding = utf8
wal_level = 'logical'
track_commit_timestamp = on
max_wal_senders = 10
max_replication_slots = 10
max_worker_processes = 10
shared_preload_libraries = 'pglogical,bdr'
Then in both machines:
- Restart PostgreSQL
- Create a database (we are calling it omnidb_tests)
- In this database, create required extensions:
CREATE EXTENSION pglogical;
CREATE EXTENSION bdr;
Connecting to both machines
We have installed OmniDB in the host machine and we also have included the appropriate entries in the pg_hba.conf file for both virtual machines, to allow connections from the host machine. Then in OmniDB, we need to create both connections:
In the Connection Grid, click on the Select Connection green button to open connections to both nodes as tabs. Then expand the PostgreSQL node, you will see that we are using latest PostgreSQL minor release (currently 10.4). Then expand the Databases node, omnidb_tests node and finally the Extensions node to check the extensions that are installed in this database: plpgsql, pglogical and bdr.
Now expand the BDR node to see some BDR properties about this node.
We can see that BDR version I am using is 3.0.1-a2 and I didn’t activate BDR in this node yet. Also there are no Groups yet.
Creating local BDR nodes
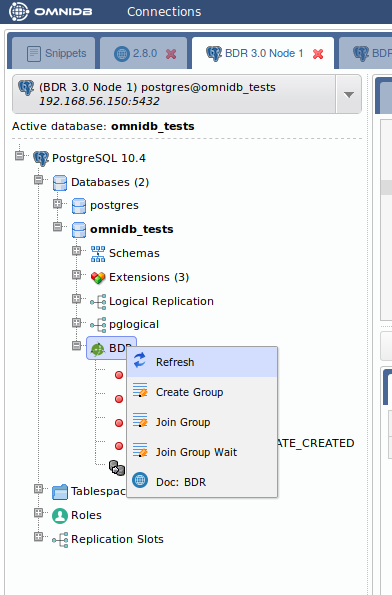
So far both machines have PostgreSQL 10, pglogical and bdr extensions installed, but they are not yet BDR nodes. To make them BDR nodes, right-click the BDR tree view node and click on the Create Local Node action. Change node_name for a unique node name in the BDR cluster you are building. The second parameter of the bdr.create_node function should be the connection string that other nodes will use to connect to this node.
Do this for both machines. We will call the first machine "node1" and the second machine "node2".
Once you executed the Create Local Node action, you can right-click on the BDR tree view node and click on Refresh. Then you will see that BDR is not active in this node yet, but the current node now has a name and a node state: BDR_PEER_STATE_CREATED.
The current node state unlocks new actions to the tree view, as we can see below.
Creating a BDR group
Now that the current node is also a BDR node, you can see the following actions:
- Create Group: Creates a BDR replication group. The current node is automatically joined to this group. Other nodes will be able to join this group later;
- Join Group: Joins the current node to an existing BDR group that was previously created in another node. It simply starts a background procedure that may take several seconds to finish;
- Join Group Wait: After you executed the Join Group action, you can execute this blocking action to wait for the current node to join the BDR group.
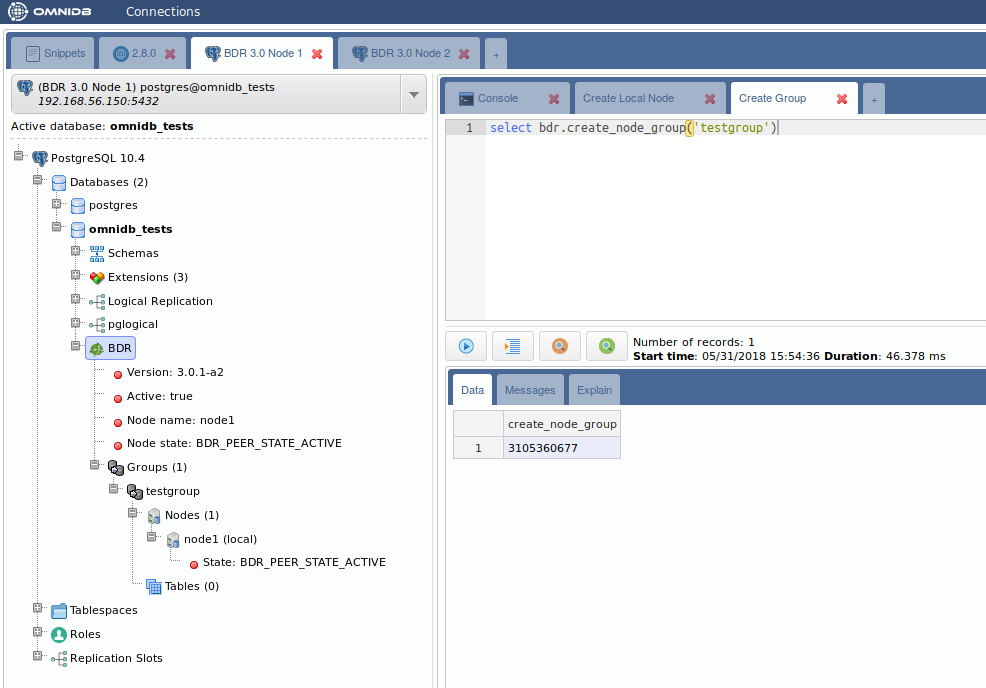
We will create a BDR group in the first node, then the second node will be able to join it. So in "node1", use the Create Group action. It will need a group name:
After you executed this action, right-click on the BDR tree view node and click on Refresh. You will see that now BDR is fully activated in "node1" which now has node state BDR_PEER_STATE_ACTIVE. The Groups tree view node is now expandable and you can see that testgroup we just created has node 1 (local) in it.
Joining a BDR group
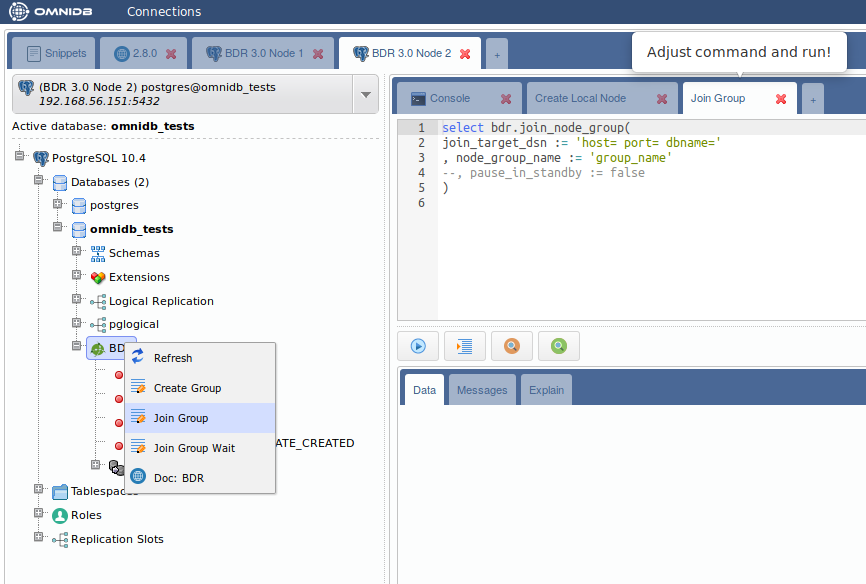
Now we will make "node2" connect to the BDR group we just created. For that we will use the Join Group action.
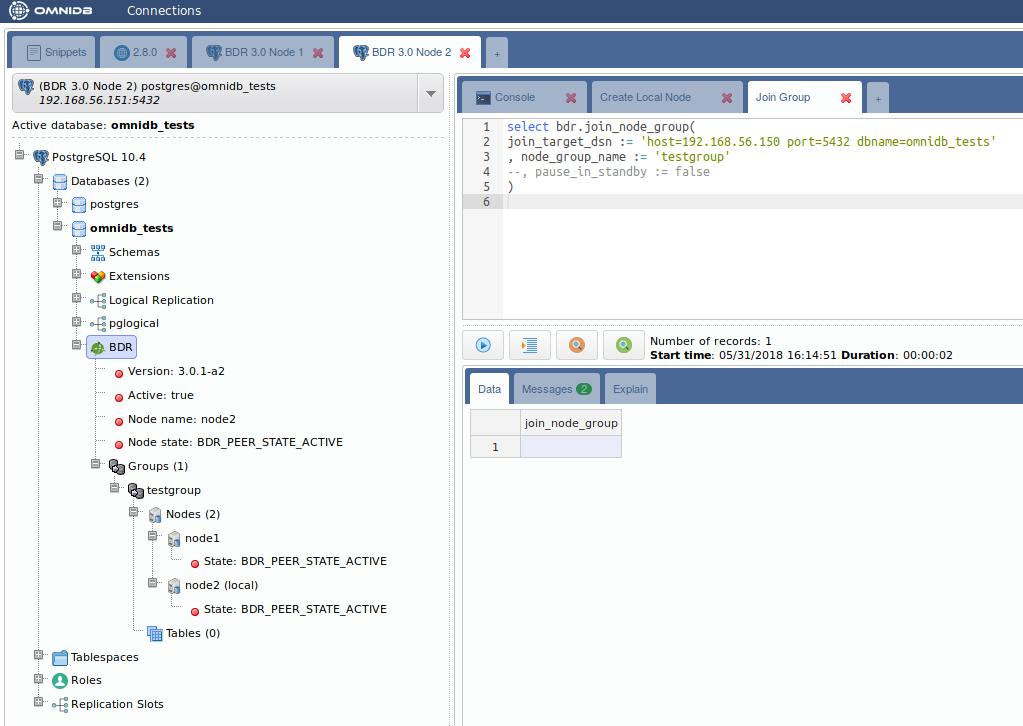
We need to fill the join_target_dsn parameter with the connection string to a node that is already in the BDR group (in this case, "node1"). We also need to write the name of the existing BDR group in the node_group_name parameter.
After amending the SQL text and executing it, wait for a few seconds and then refresh the BDR tree view node again. If you are fast enough, you can see that "node2" node state will change to BDR_PEER_STATE_JOINING and then become BDR_PEER_STATE_ACTIVE, meaning that now both machines are connected and ready to perform multi-master replication.
Right-clicking in a node of the group (except the local node) will show you the action Part Node, which allows you to remove a remote node from the BDR group. But we will not part any nodes now; we will continue demonstrating the BDR multi-master replication.
Creating a table in the first node
Let’s create a table in the first node. Expand the public schema, right click the Tables node and choose Create Table. Give the new table a name and add some columns. When done, click in the button Save Changes:
Now confirm that the table has been created in the first node by right clicking the Tables node and choosing Refresh. Go to the second node, expand the schema public, then expand the Tables node. Note that the table has been replicated from "node1" to "node2". If the table was created in the second node, it would have been created in the first node as well, because in BDR all nodes are masters.
Adding some data in the second node
While you are at the second node, right click the table bdrtest, point to Data Actions and then click in Edit Data. Add some rows to this table. When finished, click in the Save Changes button.
Now go to the first node, right click the table, point to Data Actions and then click in Query Data. See how the rows created in "node2" were automatically replicated into "node1".
Adding some data in the first node
Let’s repeat the same procedure above, but instead of inserting rows from the second node, let’s insert some rows while connected to the first node. Note how they replicate into the second node in the same way.
Controling which tables should be replicated
By default, every new table created on any of the nodes will belong to the replication group. All tables that belong to the group can be viewed in the Tables tree view node, inside the BDR group. You can right click a table and click on Remove Table to remove the table from the replication group. This way the table won’t be modified in any of the nodes, but it won’t be replicated any more. Then you can drop the table on one of the nodes and keep it in the other, for example. Similarly, the Add Table action allows you to add a table back to the replication group.


Hi guys,
How do we work with autoincremental (sequence) types of columns?
e.g.:
I have table 1 with id column nextval(…) in server 1
I have the same table 1 with id column nextval(…) in server 2
I have a proxy server so my application can get better performance, so when:
When I insert some value in table 1 in server 1 from mi app. And server 2 has to made and insert from other query get from the proxy server and used the same sequence, what can I do to get 2 diferent sequence, not the same at the same time?
Thanks in advance,
Hiram Walker
Under which license is BDR 3.0 published?
I cannot put shared_preload_libraries = ‘pglogical,bdr’ in the postgresql.conf file and CREATE EXTENSION bdr; too.
Kindly let me know whether it is wrong the installation script “apt-get install postgresql-10-pglogical” or other problem.
You’d need to provide some details, like error messages, exact steps followed, etc.
Please post on the BDR/pglogical mailing list instead.
Where could be downloaded BDR-3.0 extension? … all I find online are BDR 1.0.X extensions for PostgreSQL 9.4, and BDR 3.0.X seems that have not been released to the public.
BDR 3 is not open source and is available only to EnterpriseDB customers.