1. Introduction
Postgres-XL (or just XL, for short) is an open source project from 2ndQuadrant. It is a massively parallel database built on top of PostgreSQL, and it is designed to be horizontally scalable and flexible enough to handle various workloads.
Here we will show how to build a test environment to play with XL and how to configure it using the OmniDB 2.2 web interface.
2. Building test environment
In this experiment, we will build a cluster with 1 GTM, 1 coordinator and 2 data nodes. It would be simpler to put them in the same virtual machine, however split them across multiple virtual machines is a more realistic scenario. So we will build 3 virtual machines:
| Machine | IP | Role |
|---|---|---|
| xl_gtmcoord | 192.168.56.105 | GTM and coordinator |
| xl_datanode1 | 192.168.56.106 | data node |
| xl_datanode2 | 192.168.56.107 | data node |
For this test environment to work, you need to put both machines in the same internal network. If necessary, you can edit IP addresses in files Vagrantfile and bootstrap.shlocated inside the folder of each machine.
2.1. Pull OmniDB repo
The first thing you need to do is to download OmniDB repo from GitHub and make sure you are in the development branch. Run the following:
git clone http://github.com/OmniDB/OmniDB
cd OmniDB
git checkout dev
2.2. Creating virtual machines
On your host machine, you need to have installed:
- VirtualBox
- Vagrant
- Vagrant plugin vbguest
Please refer to VirtualBox and Vagrant websites for more information.
If necessary, please edit the file Vagrantfile for all machines now, like this:
On your terminal (assuming you are on the root directory of OmniDB repo), to create the first virtual machine with XL, you need to do:
cd OmniDB/OmniDB_app/tests/vagrant/multinode/xl_gtmcoord
vagrant up
- Download vagrant box for Debian 9 (if not present)
- Start the virtual machine based on the box
- Download updates
- Clone Postgres-XL repo
- Compile Postgres-XL
- Instantiate and start the node
Go ahead and create the other 2 virtual machines:
cd ../xl_datanode1
vagrant up
cd ../xl_datanode2
vagrant up
3. Creating nodes
At this point all machines are up and running a Postgres-XL node on each one of them. But the nodes does not know about each other. Besides, every node thinks it is a coordinator. So we need to connect to each node, alter its type and inform it about the existence of the other nodes.
3.1. xl_gtmcoord
cd OmniDB/OmniDB_app/tests/vagrant/multinode/xl_gtmcoord
vagrant ssh
sudo su
su postgres
psql -c "ALTER NODE coord1 WITH (TYPE = 'coordinator', HOST = 'localhost', PORT = 5432)"
psql -c "CREATE NODE datanode_1 WITH (TYPE = 'datanode', HOST = '192.168.56.106', PORT = 5432)"
psql -c "CREATE NODE datanode_2 WITH (TYPE = 'datanode', HOST = '192.168.56.107', PORT = 5432)"
psql -c "SELECT pgxc_pool_reload()"
3.2. xl_datanode1
cd ../xl_datanode1
vagrant ssh
sudo su
su postgres
psql -c "ALTER NODE datanode_1 WITH (TYPE = 'datanode', HOST = 'localhost', PORT = 5432)"
psql -c "CREATE NODE coord1 WITH (TYPE = 'coordinator', HOST = '192.168.56.105', PORT = 5432)"
psql -c "CREATE NODE datanode_2 WITH (TYPE = 'datanode', HOST = '192.168.56.107', PORT = 5432)"
psql -c "SELECT pgxc_pool_reload()"
3.3. xl_datanode2
cd ../xl_datanode2
vagrant ssh
sudo su
su postgres
psql -c "ALTER NODE datanode_2 WITH (TYPE = 'datanode', HOST = 'localhost', PORT = 5432)"
psql -c "CREATE NODE coord1 WITH (TYPE = 'coordinator', HOST = '192.168.56.105', PORT = 5432)"
psql -c "CREATE NODE datanode_1 WITH (TYPE = 'datanode', HOST = '192.168.56.106', PORT = 5432)"
psql -c "SELECT pgxc_pool_reload()"
4. Playing with XL
Finally we have a working Postgres-XL cluster. And it is very nice, because there are separated virtual machines for each data node.
4.1. Connecting to the cluster with OmniDB
In order to connect to the cluster with OmniDB, we need to connect to the coordinator and change the password of the user postgres. And let us also create a new database:
cd OmniDB/OmniDB_app/tests/vagrant/multinode/xl_gtmcoord
vagrant ssh
sudo su
su postgres
psql -c "ALTER USER postgres WITH PASSWORD 'omnidb'"
psql -c "CREATE DATABASE omnidb_tests"
Assuming you have OmniDB (server or app) installed in your host machine, you can connect to the coordinator in order to test the connection. In OmniDB, create a connection like this:
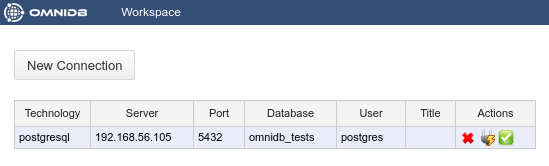
Then click on the Test Connection action. You will have to type the password of the user postgres, which we set above as omnidb. After that you can click on the Select Connection action.
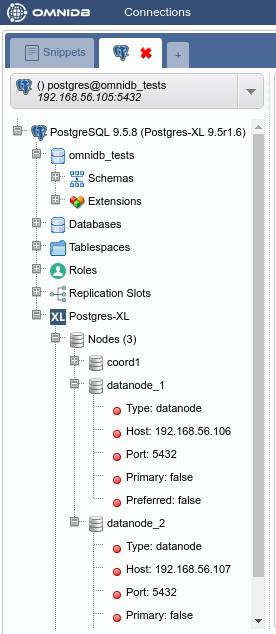
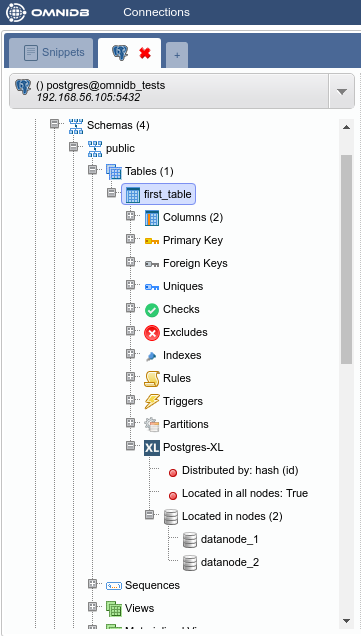
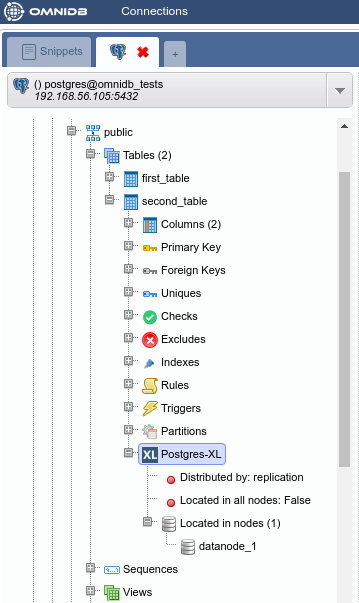
You will see OmniDB workspace window. Expand the tree root node. Note that OmniDB identifies it is connected to a Postgres-XL cluster and shows a specific node calledPostgres-XL just inside the tree root node. Expand this node to see all the nodes we have in our cluster:
4.2. Creating a HASH table
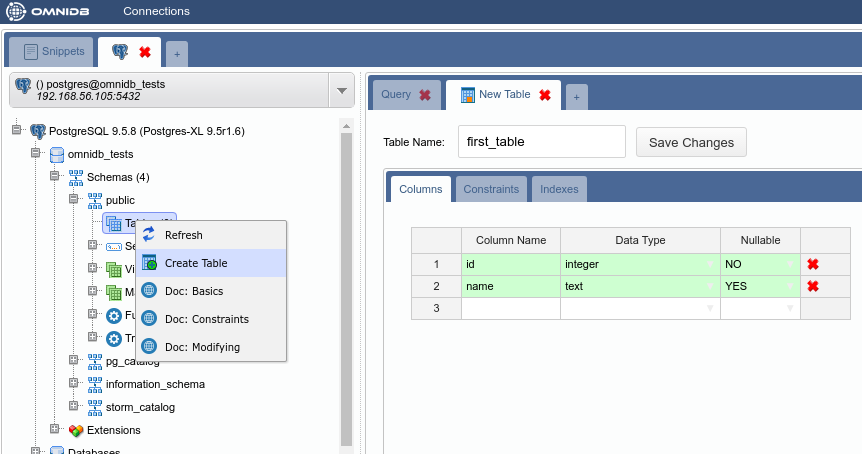
From the root node, expand Schemas, then public, then right click on the Tables node. Click on Create Table. Name your new table, add some columns to it and do not forget to add a primary key too:
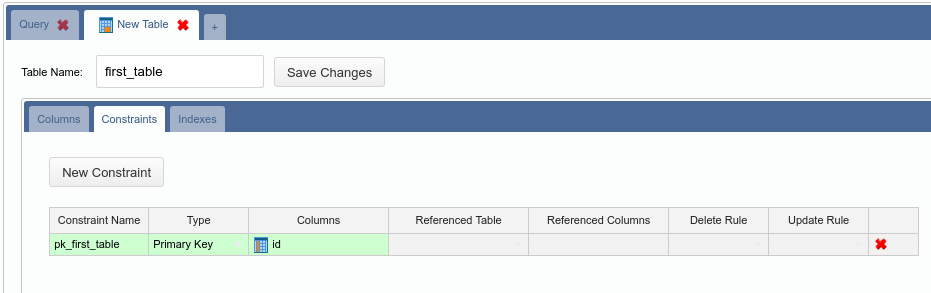
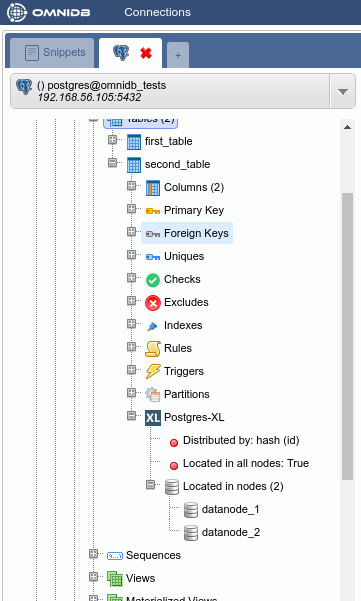
When done, click on the Save Changes button. Now right click on the Tables node and click on Refresh. You will see the new table created. Expand it to see that there is also a Postgres-XL node inside of it. Check its properties.
By default, Postgres-XL always try to create a table distributed by HASH. It means that the data will be split into the nodes regularly, through a hash function applied on the specified column. If present, it will use the primary key, or a unique constraint otherwise. If there is no primary key nor unique constraint, Postgres-XL uses the first eligible column. If not possible to distribute by HASH, then Postgres-XL will create the table distributed by ROUNDROBIN, which means that the data will be split in a way that every new row will be added to a different data node.
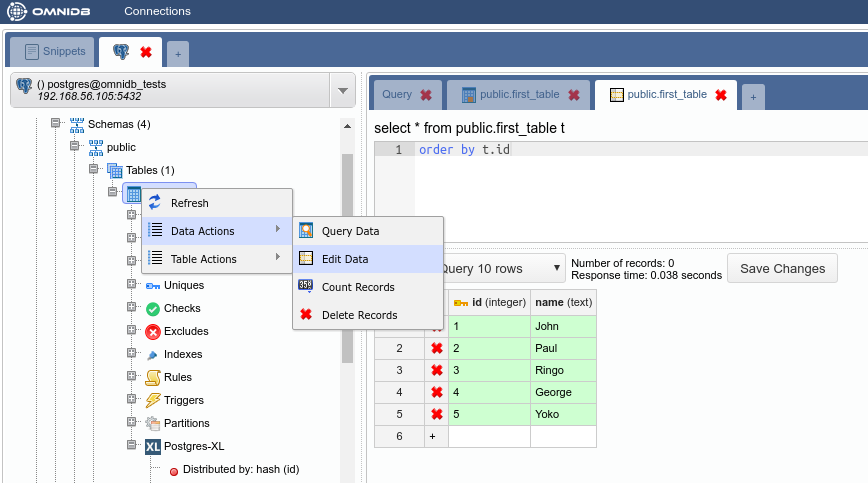
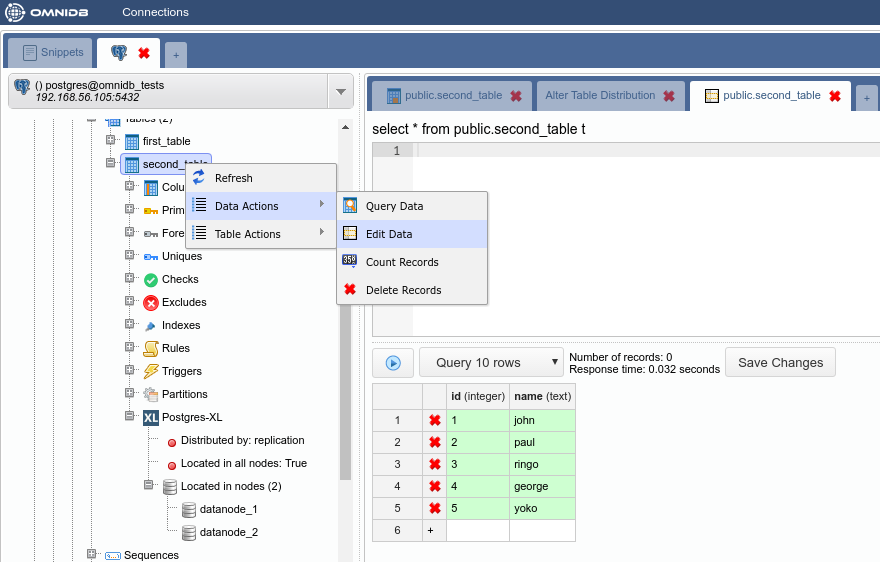
Now let’s add some rows in our new table. Right click on the table, then go to Data Actions and then click on Edit Data. Add some rows and then click on the Save Changes button:
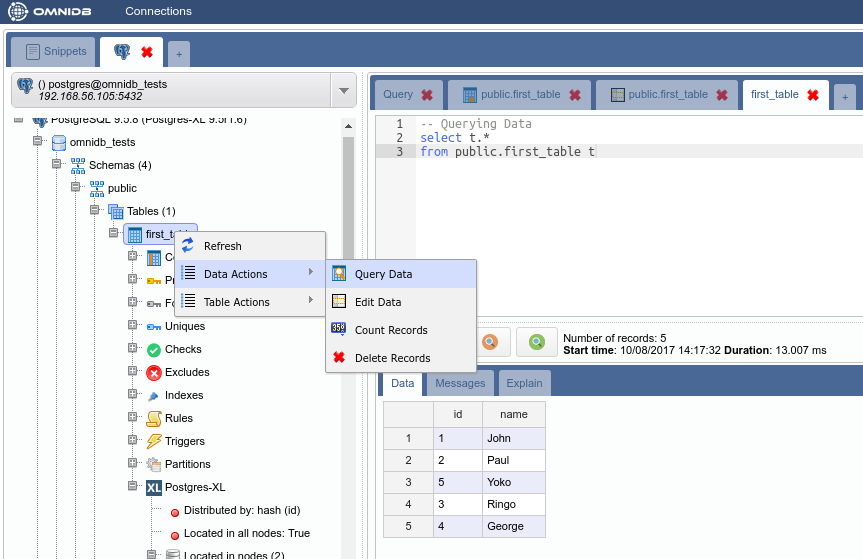
Right click on the table again, Data Actions, Query Data. You will see that cluster-wide the table has all data inside.
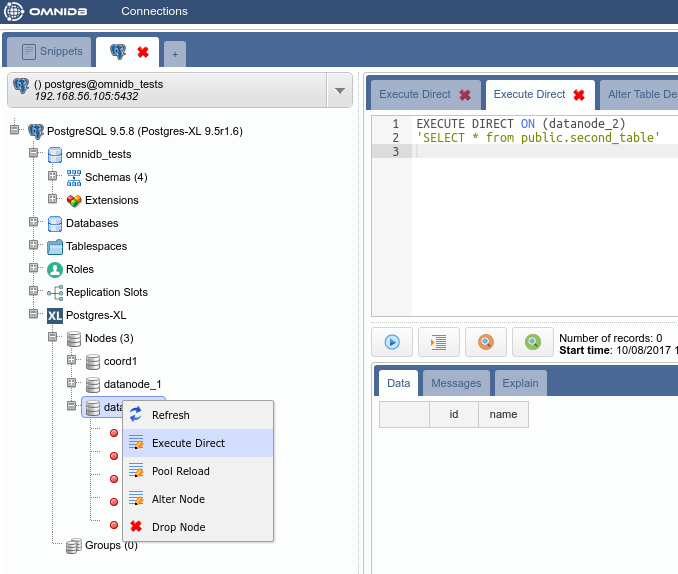
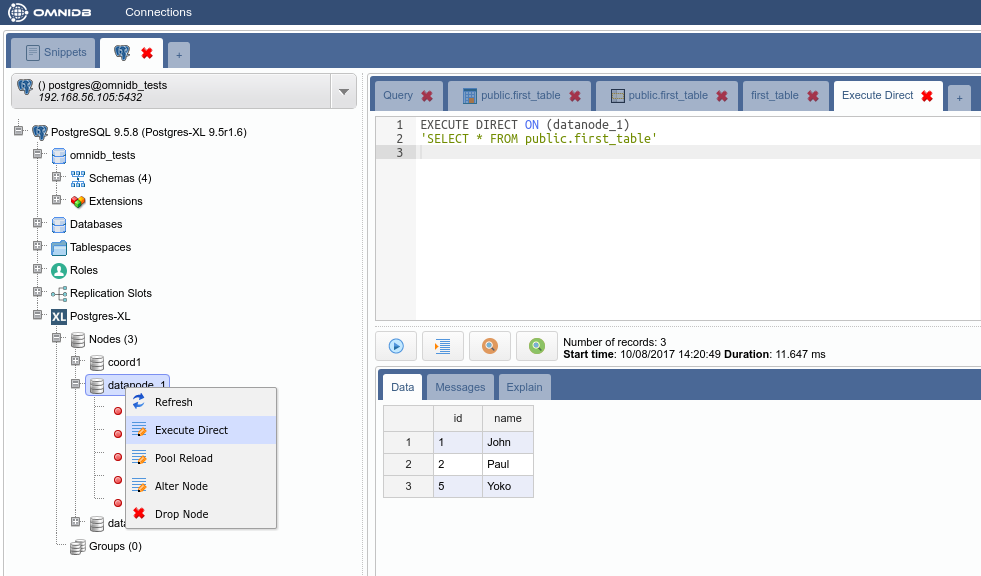
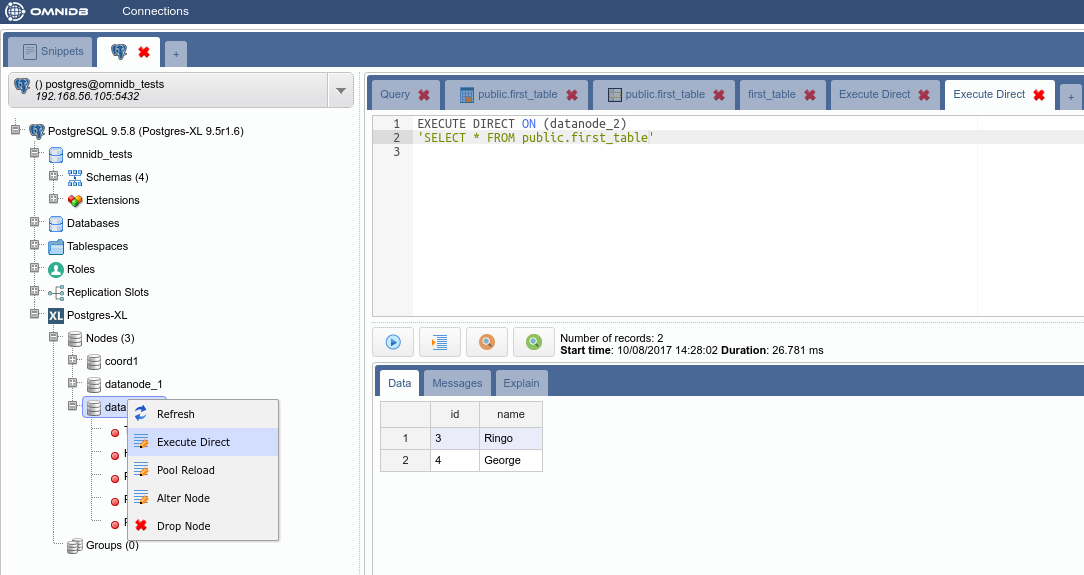
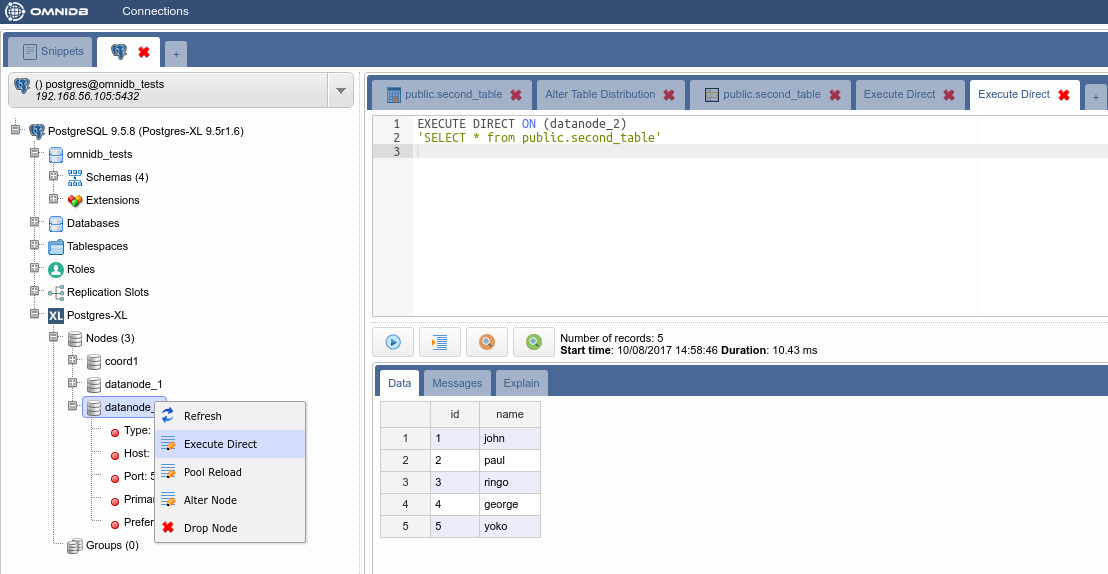
But how the data was distributed in the data nodes? In the Postgres-XL main node, right click on each node and click on Execute Direct. Adjust the query that will be executed directly into the data node, as you can see below.
4.3. Creating a REPLICATION table
While HASH distribution is great for write-only and write-mainly tables, REPLICATION distribution is great for read-only and read-mainly tables. However, a table distributed by REPLICATION will store all data in all nodes it is located.
In order to create a REPLICATION table, let us create a new table like we did before:

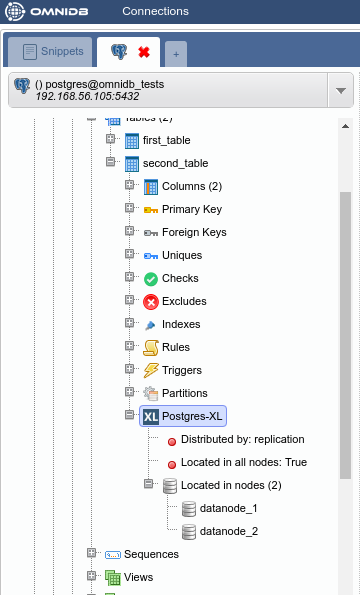
Note how by default it was created as a HASH table:
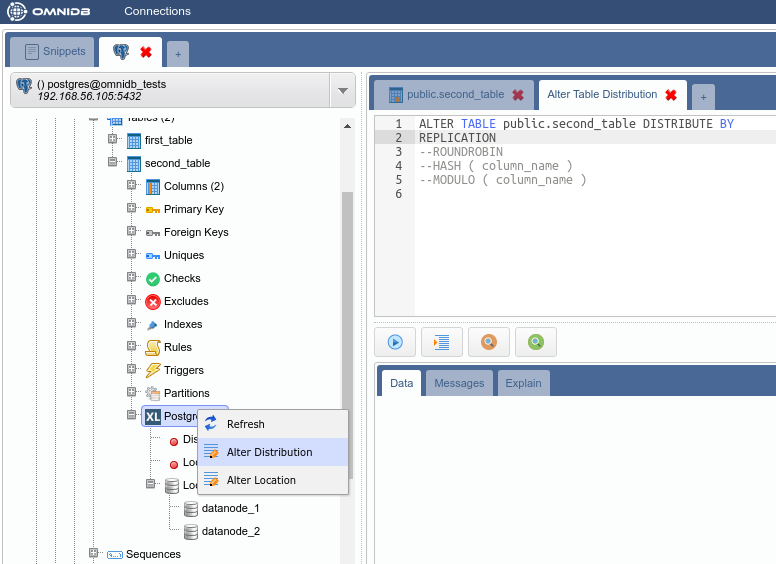
Let us change the distribution type of the table by right-clicking on the Postgres-XL node inside the table, and then clicking on Alter Distribution. Remove the comment in the “REPLICATION” line and execute the command:
You can check the distribution was successfully changed by right-clicking on the Postgres-XL node and clicking on Refresh. The properties will now show Distributed by: replication.
Now add some data to the table:
And then check that all data exist on all data nodes:

4.4. Removing a node from a table
Sometimes you do not want that a table keeps storing its data on a specific data node. One reason for this is to free up some space on the data node disk.
Let us remove data for the second table from datanode_2. In the Postgres-XL node inside the table, expand the Located in nodes node. Right click on the datanode_2 node and then click on Delete Node. Bear in mind that this will not delete the node; this will delete the table data from the node, and future data will not be stored in this node anymore.
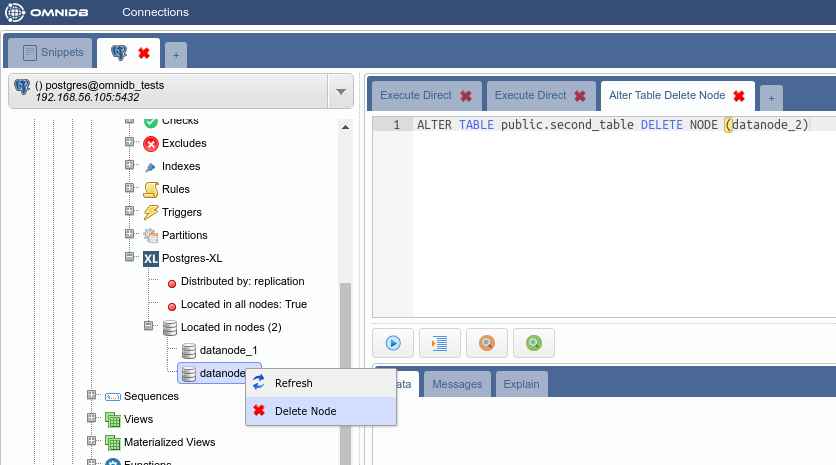
Refresh the Postgres-XL node inside the table to confirm the change.
Now use the Execute Direct feature to check that the table data exist only in one data node and not in the other: